Zoho mail is a secure, privacy-guaranteed, and ad-free email service. It provides you with a complete range of tools and an email suite, making it ideal for personal and business use cases.
Although Gmail is a go-to email service for many users, you have no control of features that might creep into the UI. The storage space is still 15 GB (shared between Google apps), and concerns about Google scanning your emails to show targeted advertisements remain.
Zoho mail is an excellent alternative to Gmail. We’ll show you how to migrate email messages and attachments from Gmail to Zoho with your domain.
Buy a Domain from the Registrar
Before configuring Zoho mail, you’ll need to buy a domain from the domain name registrar. They facilitate the registration and maintenance of domain names.
E.g., Namecheap, Google Domain, Hover, and more. If you’ve never bought a domain, here are some best tips to choose a domain registrar.
Choose a Zoho Mail Plan
You’ll need a business email account to host email at a custom domain. Head to Zoho Mail’s homepage, select the Business Email radio button, and click Sign Up for Free.
You can go with Zoho’s Forever Free plan if all you want is to host email for a single domain. See the Zoho Mail pricing page for more details.
Verify Domain in Zoho Mail
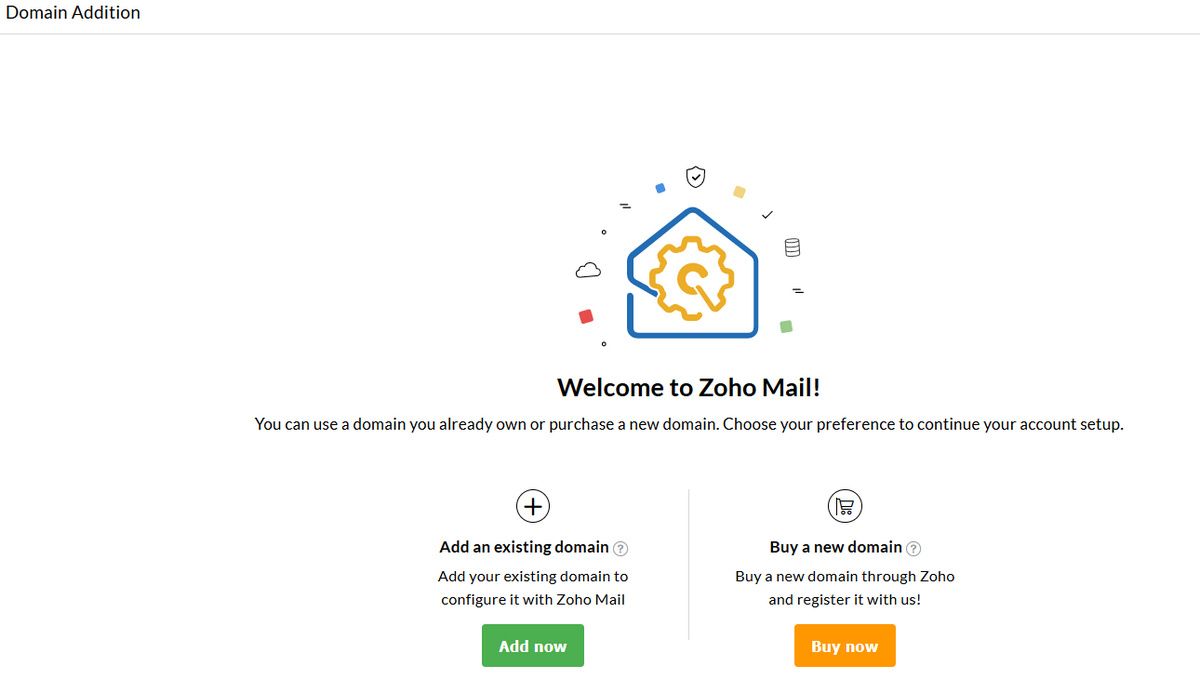
On the Domain Addition page, click Add now under Add an existing domain section.
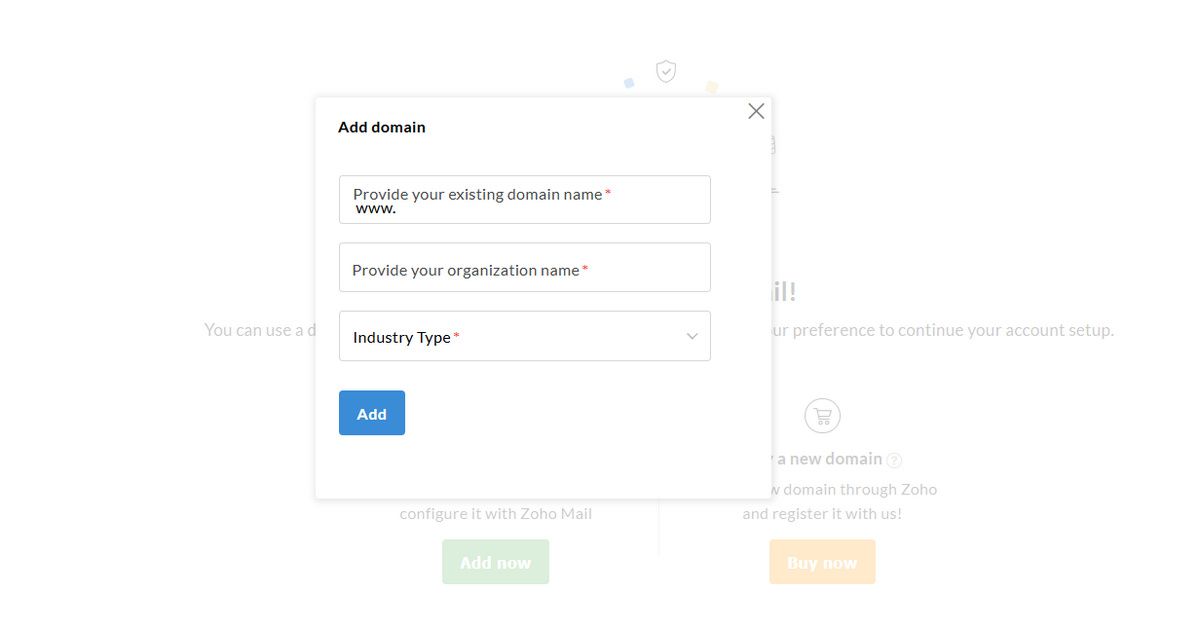
Type in your domain address and the name of your organization.
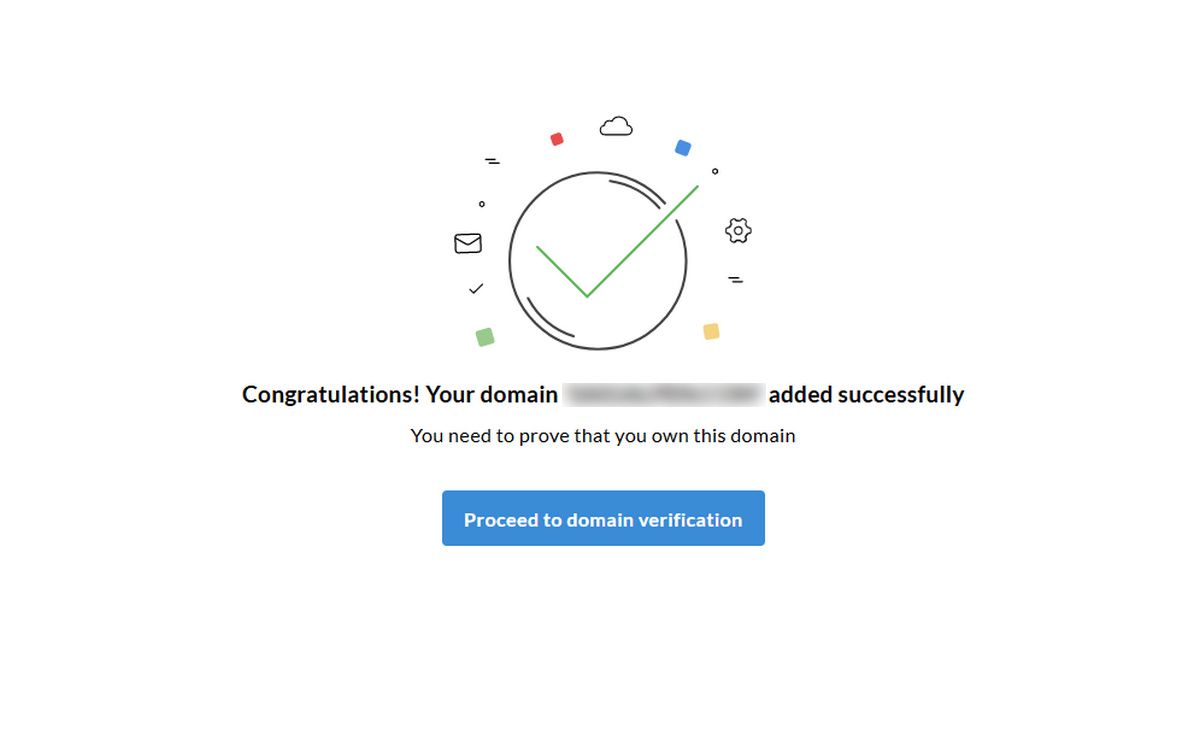
Click Proceed to domain verification to confirm your domain. To verify your domain, we’ll set up a new “TXT record” following the instructions from Zoho.
The author of this article uses Namecheap. If you choose any other provider, the underlying steps may change slightly, but the fundamental remains unchanged.
Add the TXT Record
Navigate to Account > Domain List and click Manage next to the domain you want to add the “TXT record.” Now go to Advanced DNS and click Add New Record.
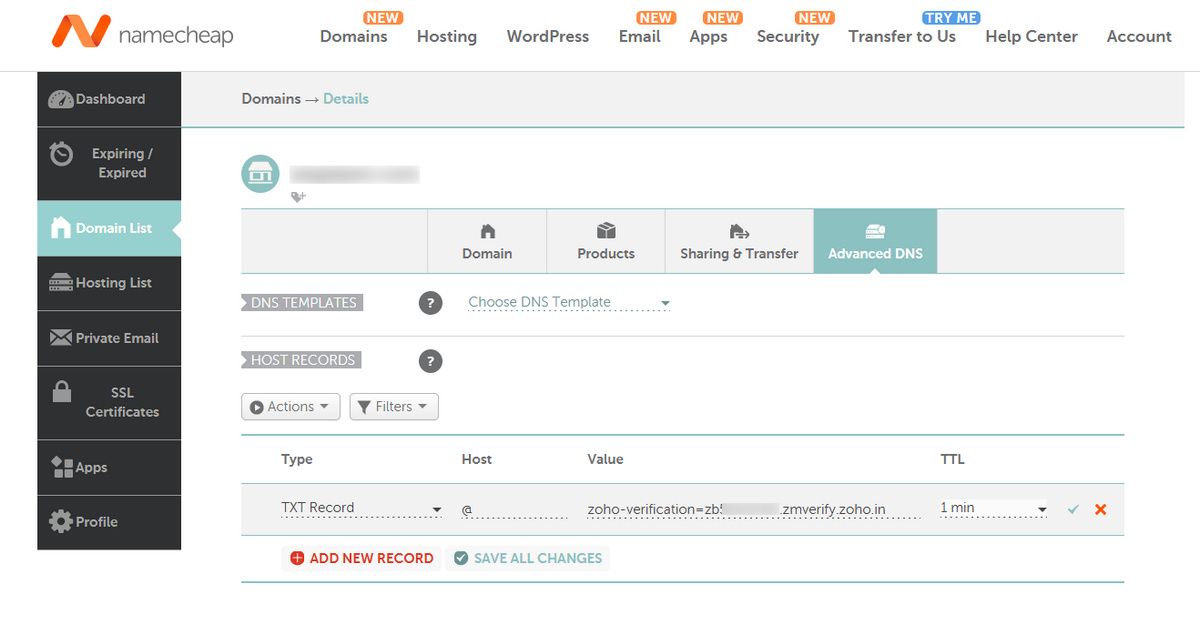
Set the record type as “TXT record.” In the Host field, enter “@.” And in the TXT Value field, enter the TXT value generated in the Zoho Mail Admin Console. In the TTL field, select Automatic.
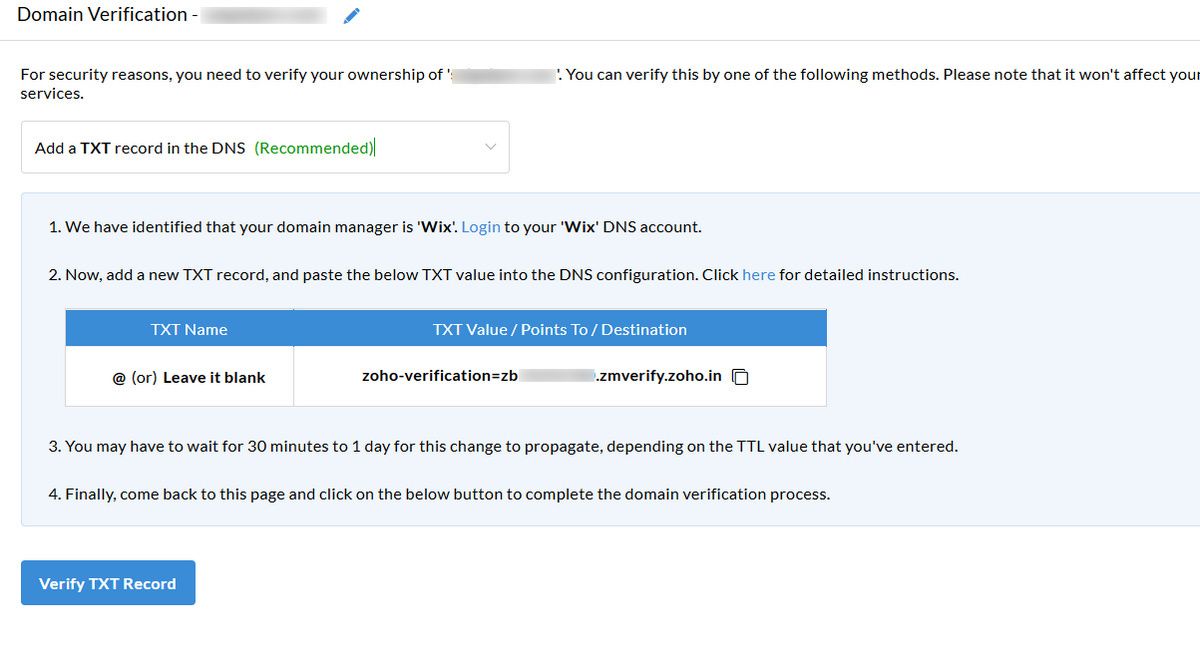
TTL (Time to Live) value for a server is the length of time (in seconds) for which any DNS resolver can get the up-to-date information from the database. For example, if you set the TTL as “1 min,” the resolver will cache the record for that duration but, on expiry, will request new information.
Wait for at least 30 to 60 minutes before clicking the Verify TXT Record button to propagate the changes across the network.
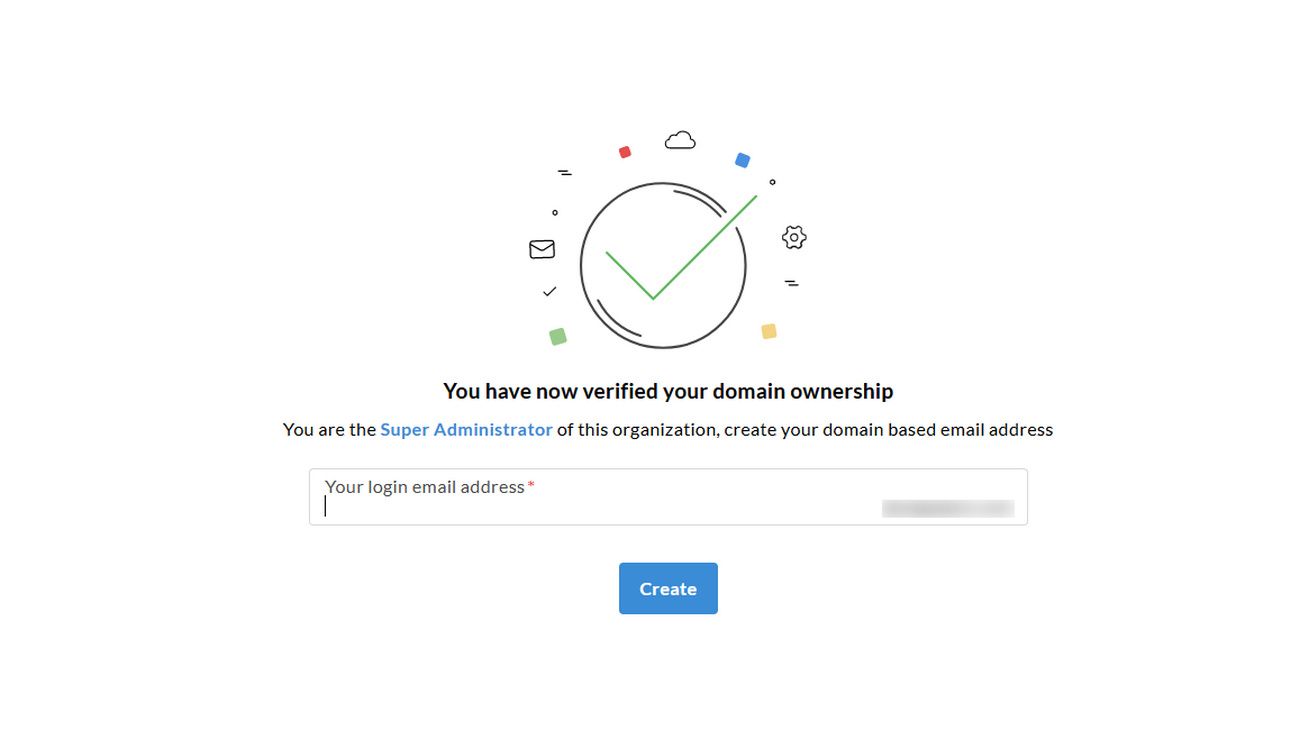
Create Your Email Address and Add Users
Now create your domain-based email address and click Create.
In the next step, you’ll be given the option to add more users. You can either add users one by one, import them by using a CSV file (download the sample file from Zoho for instructions), import from G Suite in bulk, or send an invitation to individual users.
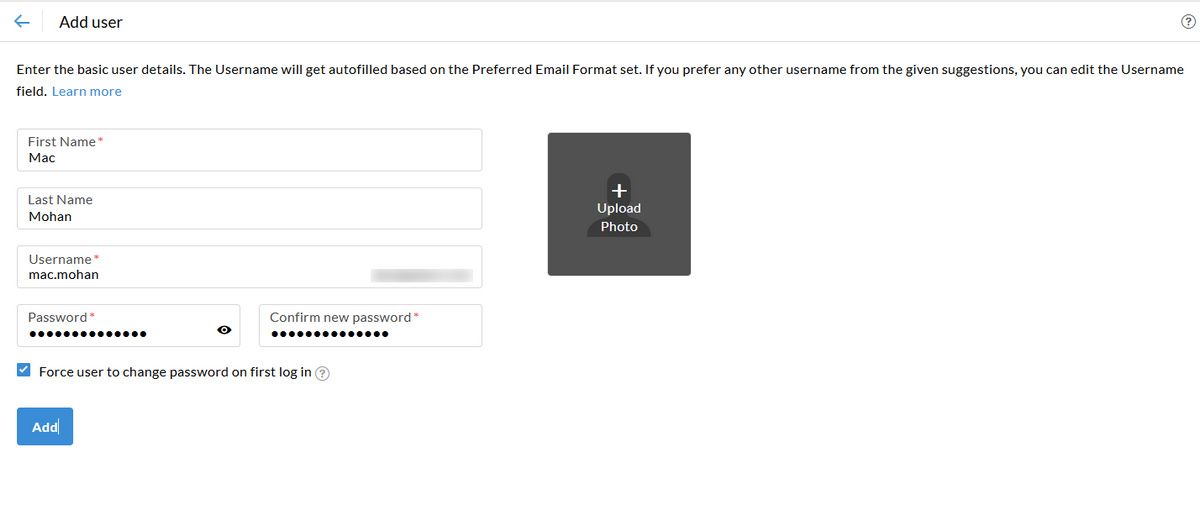
Map Your DNS With Zoho Mail
In order to successfully map your DNS with Zoho Mail, you need to configure the MX records to start receiving emails. We also recommend setting SPF and DKIM to authenticate your mail server and prevent email spoofing.
MX (Mail Exchanger) Record
MX record is a type of DNS record that specifies the server responsible for receiving emails. To add the MX record, navigate to Advanced DNS, and choose Custom MX under Mail Settings.
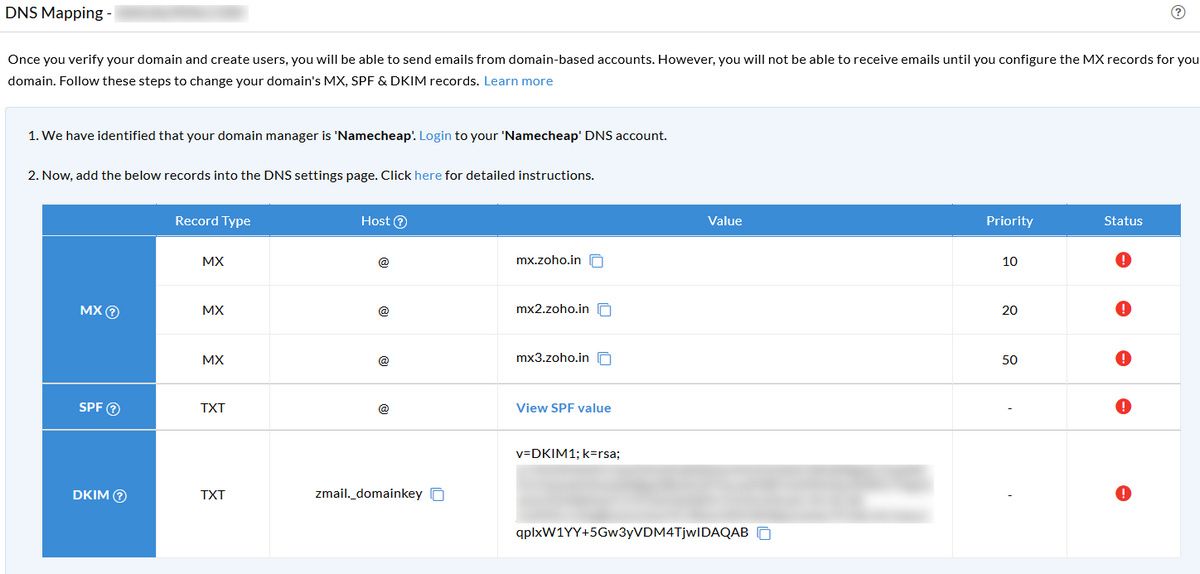
In the Host field, enter “@.” And in the Value field, type in “mx.zoho.in” with the priority set to 10. Then add the second (mx2) and third (mx3) records with priority set to 20 and 50, and click Save.
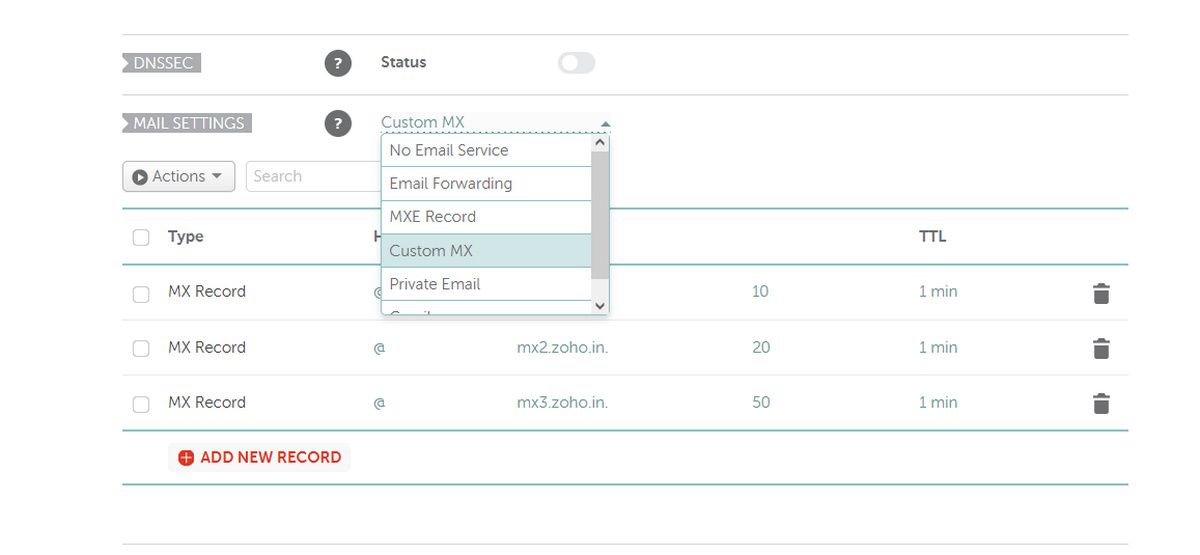
The mail servers will deliver your email in the ascending order of the preference. The lower the priority number, the higher the preference. If the mail server cannot send the email due to network failure or other reasons, it’ll attempt to deliver through the next preference order.
SPF (Sender Policy Framework)
SPF is a type of DNS TXT record to validate what hosts are configured to send emails from a given domain. The recipient mail server can look up the “TXT record” in the sender’s domain to confirm the authenticity of that email.
SPF is critical for email marketing, support services, and ensuring that email reaches the recipient’s inbox. In the email header, you can see metadata, SPF and DKIM validation data, and more by tracing an email address back to the source IP address.
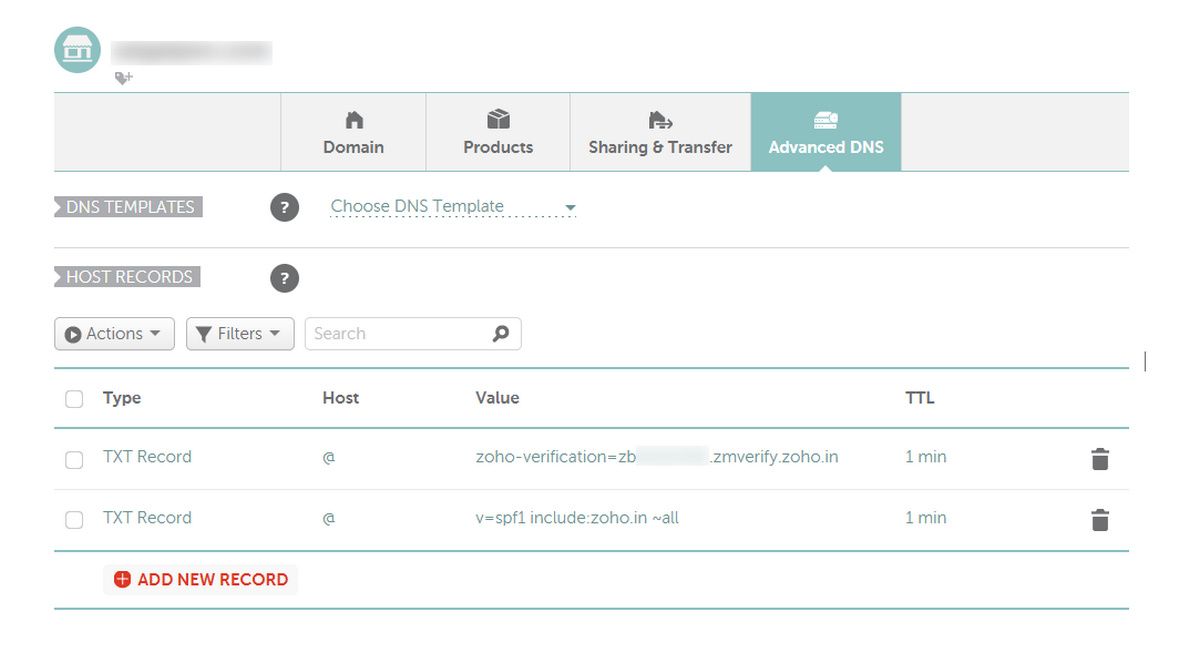
To add the SPF record, navigate to Advanced DNS and click Add New Record located under “Host Records.” Select “TXT record” as the record type, fill the Host field with “@” and enter “v=spf1 include:zoho.inall” in the Value field.
DKIM (Domain Keys Identified Mail)
DKIM is a type of DNS TXT record that adds a digital signature (using public and private keys) to every outgoing message and validates the email’s authenticity from a given domain.
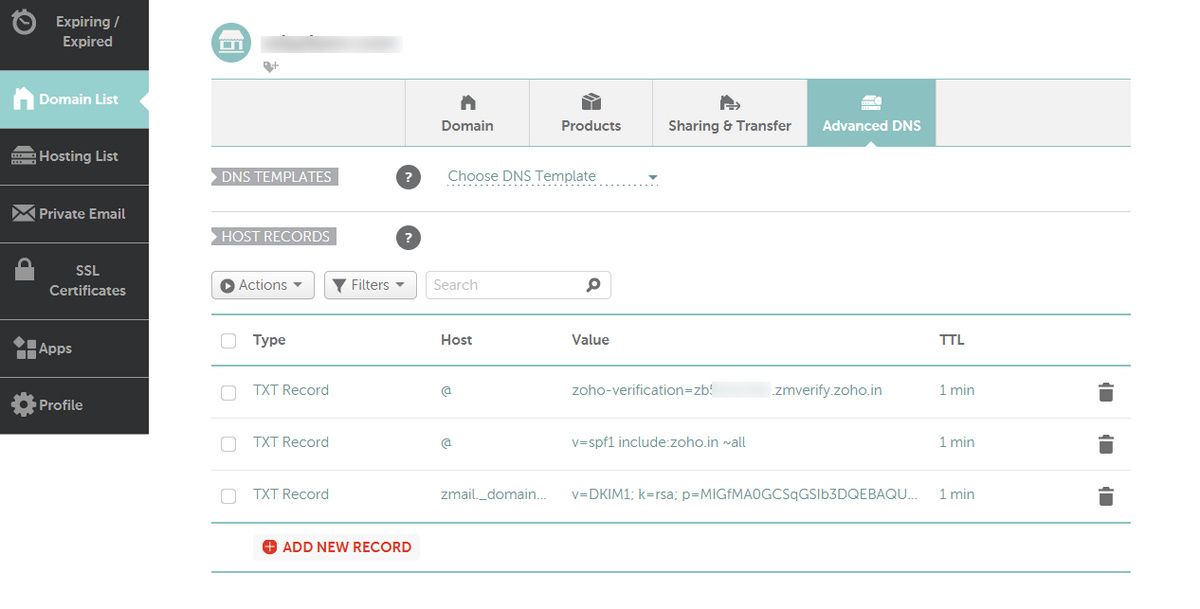
By default, Zoho automatically generates a unique DKIM key. To add the DKIM record, navigate to Advanced DNS and click Add New Record located under “Host Records.”
Select “TXT record” as the record type, fill the Host field with “zmail._domainkey” and paste the value of the DKIM record from the Zoho Admin Console.
Email Migration
Once you set up the MX and SPF+DKIM records, don’t forget to click Verify All Records before you perform email migration. Zoho Mail offers a simple solution to migrating data from various email providers like GSuite, Office 365, Microsoft Exchange, Gmail, etc.
Things To Do Beforehand
If you’ve been using Gmail for a long time, you may have accumulated a lot of junk, unnecessary emails, and space-hogging attachments. Before you perform data migration, it is essential to free up storage space in your Gmail and organize them into labels. Here’s why
- Zoho Mail Lite offers only 5 GB/user. You have to ensure that the space taken by messages and attachments stays within 5 GB for a smooth migration. Or, you can purchase additional storage from your Zoho account. It will be listed under add-ons.
- Gmail will throttle the data traffic in IMAP after a specific interval. After that, the migration will be slow. The fewer emails or attachments, the greater the success rate for data migration.
Configure the Server Details
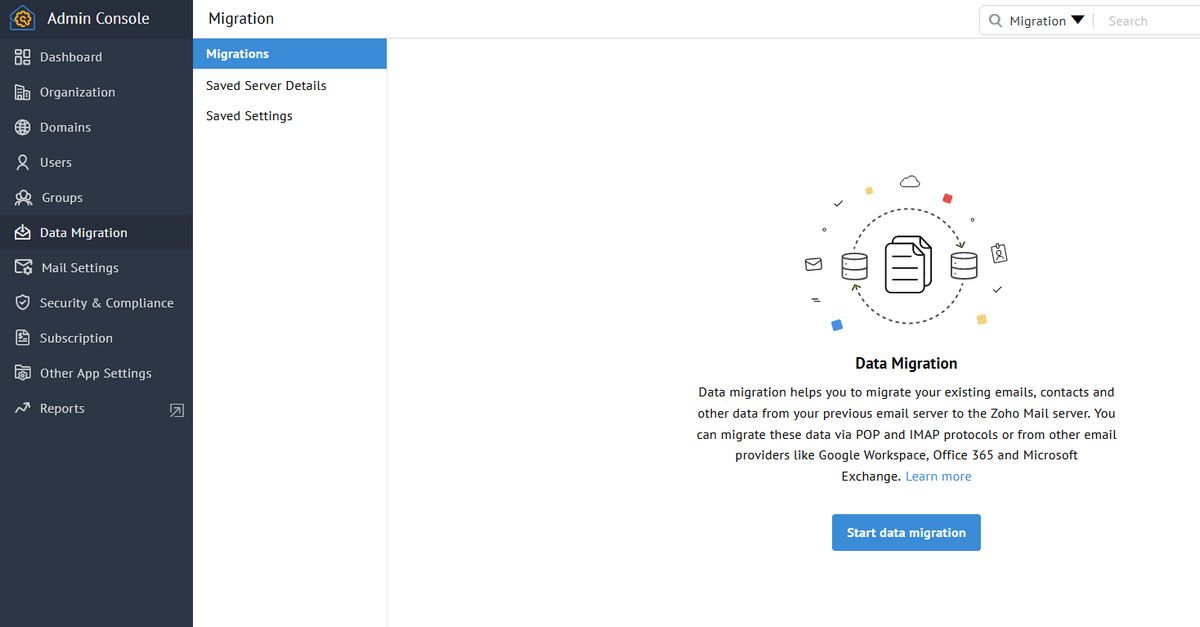
Log in to Zoho Mail Admin Console and choose Data Migration from the left sidebar. Under Migrations, click on Start data migration.
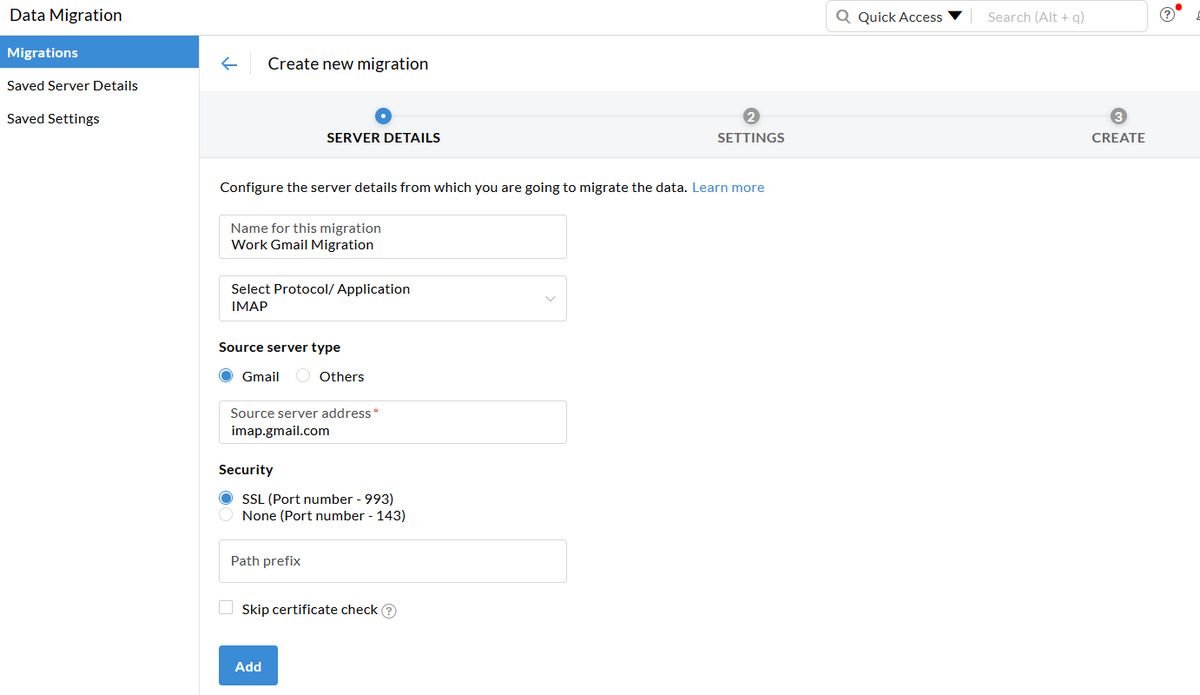
Enter a name for the server configuration (for your reference). Select IMAP from the Select Protocol/Application menu, and check Gmail. The source server address will get automatically populated, and make sure to choose SSL with port number 993. Click Add.
Tweak the Settings
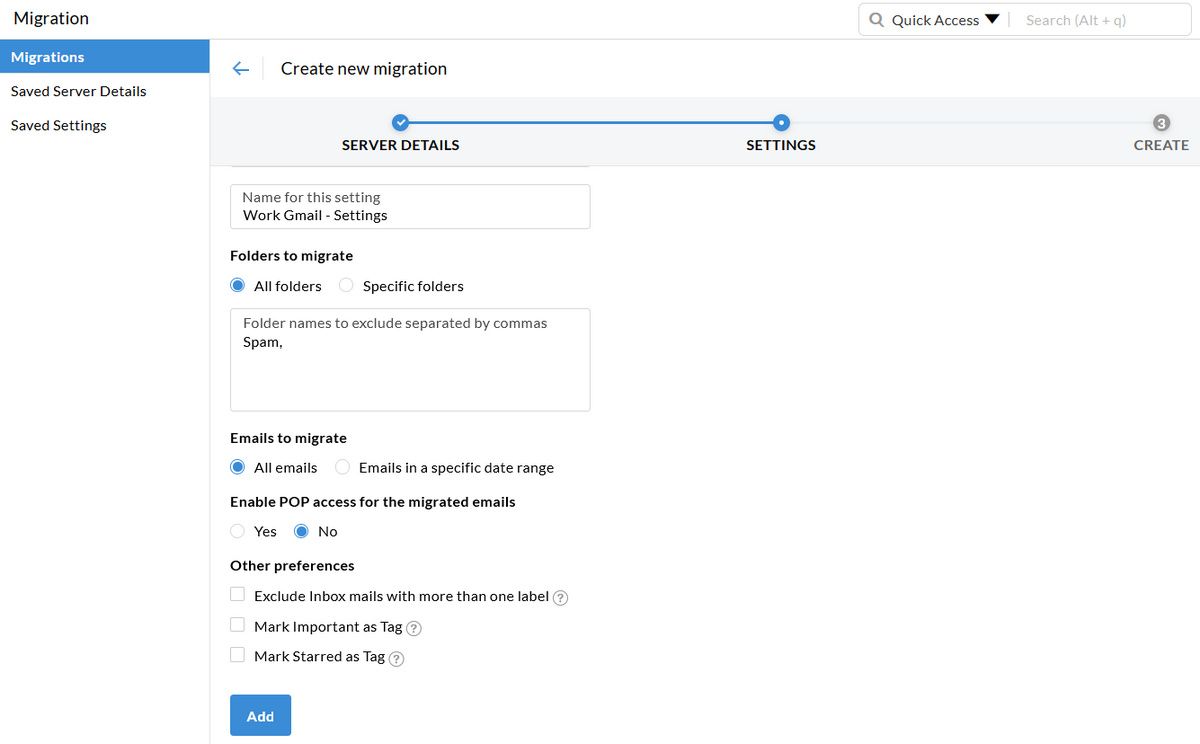
Under Emails to migrate, select whether you want to migrate all the emails or with a specific date range. There are some crucial preferences you might want to consider.
- If an email has multiple labels, check Exclude Inbox mails with more than one label to exclude those emails from migrating to Zoho.
- Check Mark Important as Tag to add emails with the “Important” tag as “ZMImportant” in Zoho Mail.
- Check Mark Starred as Tag to add emails with the “Starred” tag as “ZMStarred” in Zoho Mail.
Create New Migration
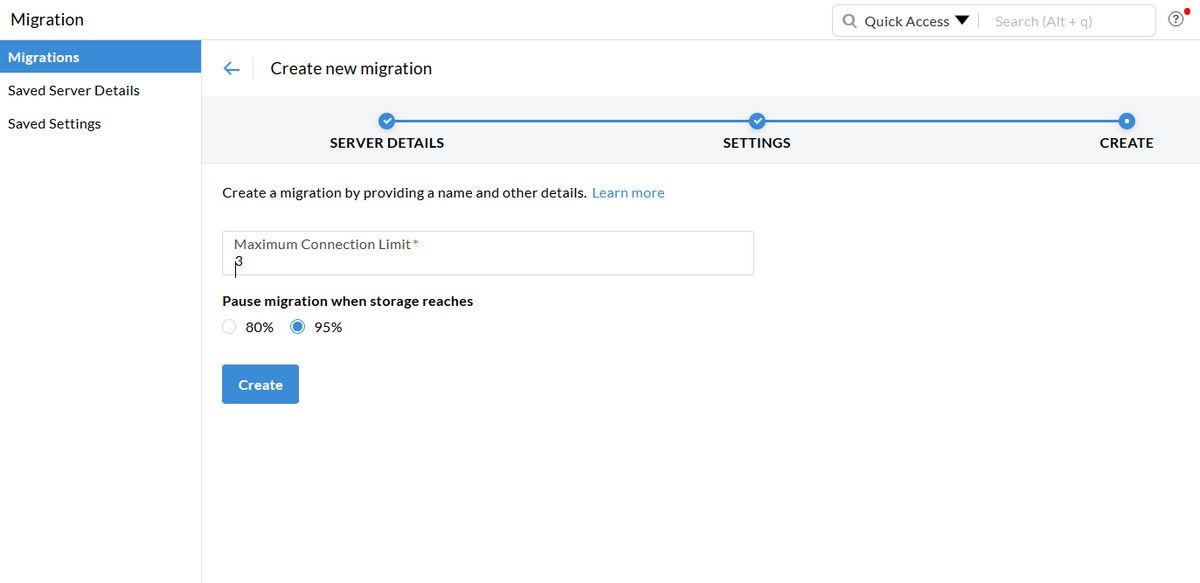
In here, enter the Maximum Connection Limit. The limit you set depends on the number of users you have authorized. If you’re the only user, set the connection limit as “1” as you don’t want Gmail to throttle the migration process. Click Create.
Add the Gmail User Details
Enter the source username and password of the user and choose the destination email address for this user. Select the Priority of the migration and click Add.
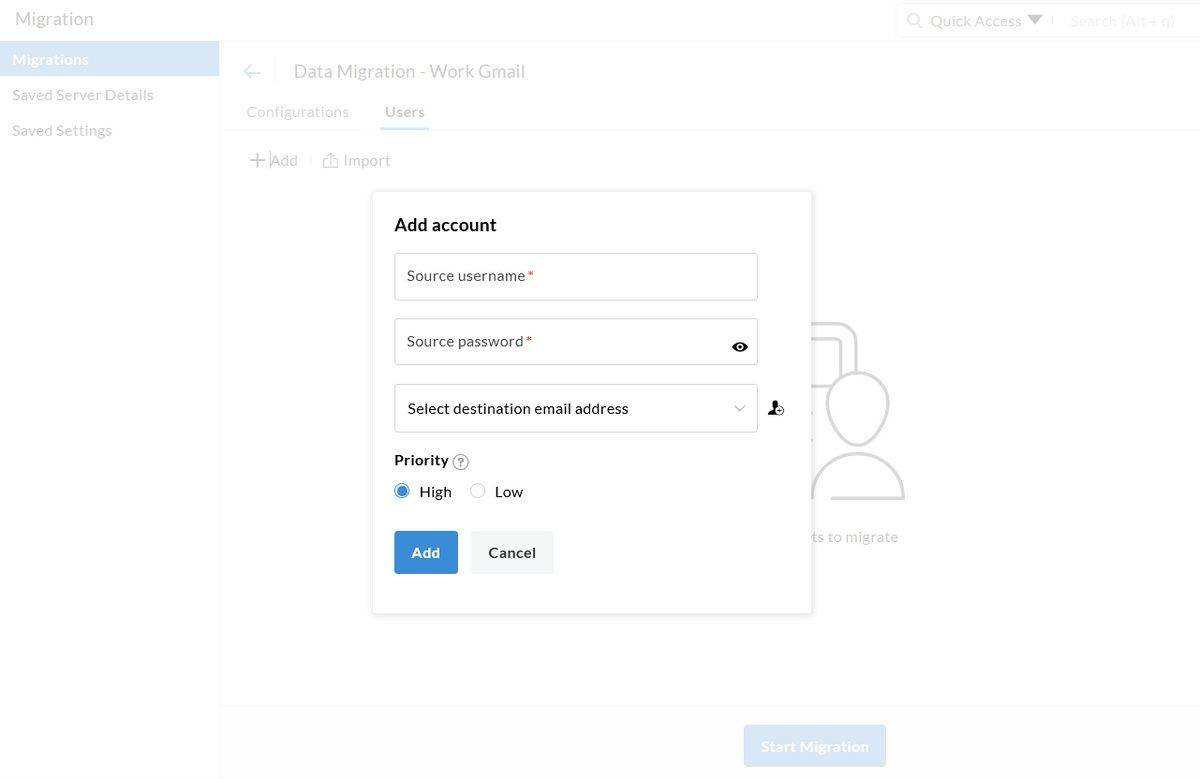
If you’re getting an error message “Unable to access your account,” make sure to Enable IMAP located in Settings > Forwarding and POP/IMAP. Also, generate an app-specific password specifically for handling email migration. At last, click Start Migration.
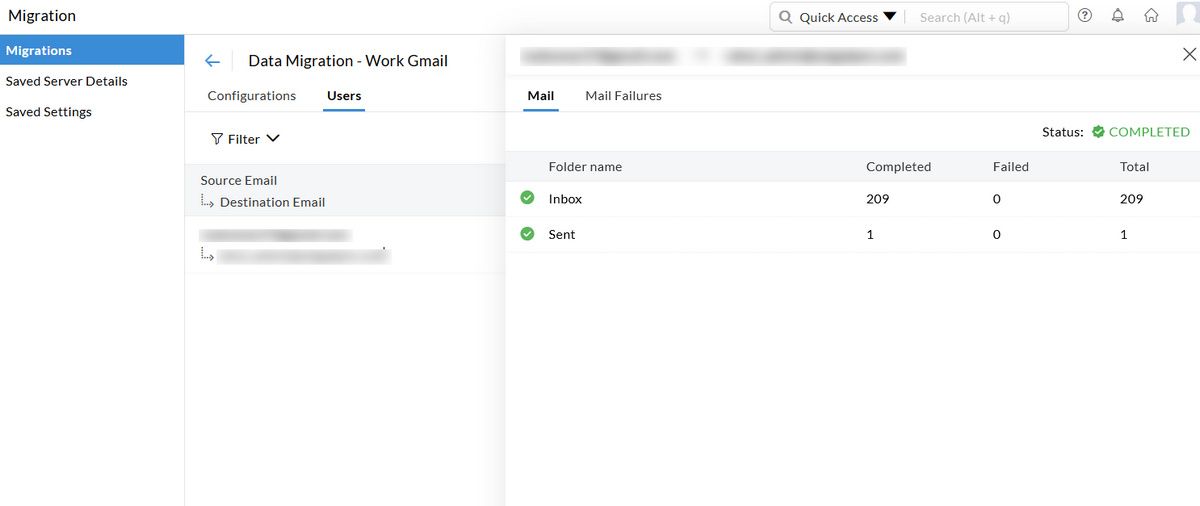
Wait for the process to get completed. Once the migration completes, you’ll see the detailed report along with the folder information.
Reasons for Using Zoho
The entire procedure of migrating email from Gmail to Zoho may seem complicated, but all it takes is a few clicks and patience. We recommend you run a test migration before the actual process.
Keep the maximum connection limit low and ensure that you have sufficient storage space. That said, the author has been using Zoho Mail for three years. We recommend you to try Zoho and check out the reasons for using Zoho Mail.
Read Next
About The Author


